
I was invited to give a workshop at the Columbia Art Center in Columbia, MD this past weekend, and I would like to share with you some pictures and paintings from the workshop. For the first time, I taught my "rivulet technique" in a workshop setting. People have often asked me how I create the interesting textural effect in some of my paintings. So the purpose of the workshop was to teach about the characteristics of certain watercolor pigments and the textural effects that can be achieved by them, and then to have to students apply these techniques to a figure or portrait painting.
This first photo is of me on the second day of the workshop, demonstrating the rivulet technique on a painting that is going to be a statue. Many thanks to Lindsay Lucas for the photo! Scroll down to see paintings by the students and a description of the techniques.


For the first day of the workshop, I wanted the students to have a chance to practice doing the rivulet technique, and also using stencil brushes to "lift off" the non-stainting pigments that we were using in order to create the lighter parts of the picture. Since we only had two days, I did not want students to have to spend a lot of time drawing. So I provided for each of them a quarter sheet of Arches 140 lb cold-pressed paper with a contour image already printed on it showing the face of a famous artist. I called these our "Artist Hero" sheets. Below you can see the one I painted. Can you guess who this is? At the end of the blog I will give you the answer.
The pre-printed sheets were created on my medium-format Epson printer using indelible inks. First I took the raw photo (derived by Googling these artist heroes), and put it through a Photoshop filter called "photocopy". Then I adjusted and lightened the image so it would not be too dark. And last I put a quarter sheet of Arches into the printer and printed each one. We had seven different famous artists to work from.


This first photo is of me on the second day of the workshop, demonstrating the rivulet technique on a painting that is going to be a statue. Many thanks to Lindsay Lucas for the photo! Scroll down to see paintings by the students and a description of the techniques.

Susan Avis Murphy demonstrating her rivulet technique

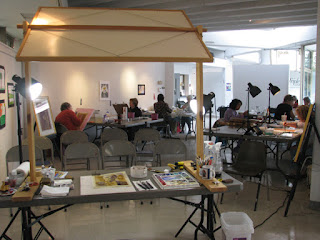
This is the Columbia Art Center, where the workshop was held.

Thanks to Karen Schuster for this photo!

And thanks to Anne Mauer for this one! The painting above is a watercolor by yours truly titled Mounted Water Sprite

We had eleven people in the workshop. The Columbia Art Center was a good location for this, and they provided nice hospitality and refreshments for us!

For the first day of the workshop, I wanted the students to have a chance to practice doing the rivulet technique, and also using stencil brushes to "lift off" the non-stainting pigments that we were using in order to create the lighter parts of the picture. Since we only had two days, I did not want students to have to spend a lot of time drawing. So I provided for each of them a quarter sheet of Arches 140 lb cold-pressed paper with a contour image already printed on it showing the face of a famous artist. I called these our "Artist Hero" sheets. Below you can see the one I painted. Can you guess who this is? At the end of the blog I will give you the answer.
The pre-printed sheets were created on my medium-format Epson printer using indelible inks. First I took the raw photo (derived by Googling these artist heroes), and put it through a Photoshop filter called "photocopy". Then I adjusted and lightened the image so it would not be too dark. And last I put a quarter sheet of Arches into the printer and printed each one. We had seven different famous artists to work from.
 |
| Step one: the pre-printed sheet |
 |
| Step 2 |
Step 2: the rivulet technique has already been done (more about this below), some of the lights on his face have been lifted out, and some of the darks have been glazed in
 |
| Step 3 |
Step 3: More lights have been lifted and more darks glazed in. The painting has not been finished yet, and eventually I hope to add the finished image to this posting.
Now for some of the paintings done by students in the workshop. These came out extremely well in my opinion! I wasn't sure how well people would be able to do this technique the first time, but obviously I had a group of artists who catch on fast! Some of these paintings are not quite finished. Also I was not able to capture a photo of each and every painting. If the artists can email me their photos, I can put them on this post! Missing are Pablo Picasso and John Singer Sargent!

NC Wyeth by Karen Schuster

An Older Georgia O'Keeffe by Joan Lok

Frida Kahlo by Madalyn Johns

Frida Kahlo by Pam Hannasch

Georgia O'Keeffe by Anupama Sinha

A Young Georgia O'Keeffe by Julia Neidorf

Frida Kahlo by Carol Zika

Frida Kahlo by Anne Mauer
Now I am going to discuss a little bit about the procedure we used in doing these paintings, and also show the first half of my painting process for the demonstration of a statue that I did on the second day. Below is a copy of my reference photo, which is a small statue in a
pebble garden at Dumbarton Oaks, a beautiful Georgetown garden in
Washington, DC. Unfortunately I do not have a photo of the first step, where the drawing has been completed. But if you can imagine, on a half sheet of stretched Arches 140 lb cold-pressed paper, I had created a contour drawing of a statue. I then went over the graphite with an indelible Sakura Micron pen (a 01 fine medium brown felt tip pen that uses pigmented ink, which is both lightfast and indelible) so that the drawing would not wash off in the next step.

reference photo for Sprite of Dumbarton by Susan Avis Murphy
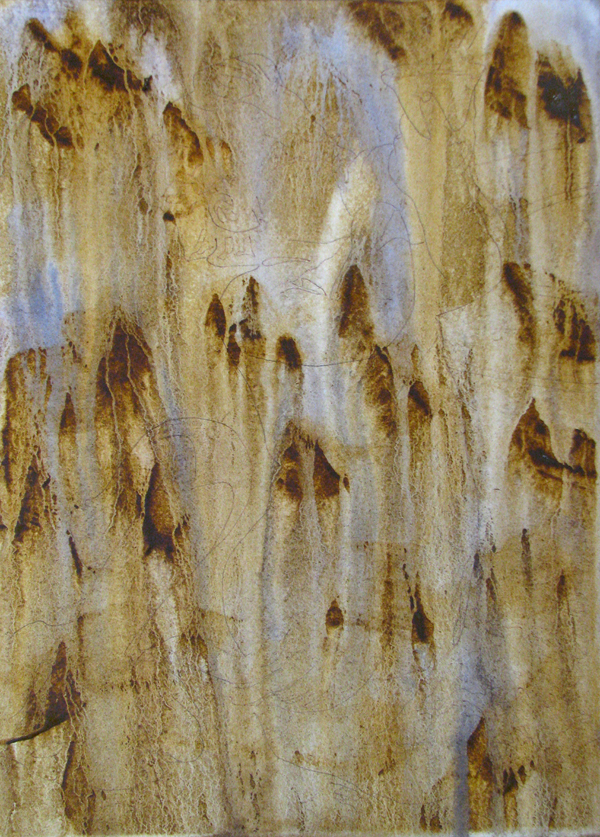
In Step 1 below, I have done a large wash over the entire sheet, using Winsor & Newton raw umber, and Holbein verditer blue. I worked quickly, keeping all the paint wet, and then tilted the board and sprayed the paint with a fine water sprayed (like a plant mister), causing the paint to drop down the paper. This results in an interesting textural effect as the water passes through the raw umber and forms "rivulets". See the detail below.
| Step 1: the rivulet wash |
| Step 1 detail |
In Step 2 below, I have done two important things. First, I began to lift out the paint on the light parts of the statue, mainly where sunlight is striking the edges. To do this lifting process, I used small stencil brushes, which are blunt bristle brushes used to daub on paint through a stencil. Of course we are not using stencils here, but the brushes are extremely useful for removing watercolor paint from a picture because they are stiff and the round blunt ones can obtain almost a hard edge. This entire painting process depends upon the use of "liftable" paints, ie, pigments that are not staining by nature.
Second, I applied a light glaze of transparent colors around the top half of the statue in order to bring out his shape. Here I had to be careful to apply the glaze gently and not scrub the underlying paint because I wanted the underlying rivulet texture to show through the glaze!
| Step 2: lifting |
In Step 3 below, I have also applied a light glaze to the statue itself to darken the shadow side a little. The colors I used were Winsor and Newton permanent violet and cobalt violet, and Holbein vertider blue. This is an opportunity to incorporate more color into an otherwise brown picture! Again, I had to apply the wash with a light touch to avoid dissolving the underlying raw umber, which is a very liftable color.
| Step 3: first glazing |
In Step 4 below, I have done more glazing of the shadow areas, and have started delineating areas of the body a little more. I am not going to go too far with this, since I don't want to over-work the picture. One of the nice things about having this textured background wash, is that most of the picture already has a kind of painterly detail, so that you do not have to incorporate so much realistic detail. Also I have used a light wash of titanium white in the background. This is an opaque color, but if you apply it as a translucent wash, the rivulet texture will still show through. This is as far as I got on the demonstration during the workshop. I
will try to finish the painting and post the final results on this
blog. I intend to add a more darks around the body of the statue and in his pedestal to define it a little more, but otherwise it is almost finished. The below photo of the painting was taken at my home studio using my photography lights, and is more truly representative of the colors in the picture.
Sprite of Dumbarton (unfinished) by Susan Avis Murphy
In conclusion, in your next painting you might want to consider using non-staining paints and a lifting method to retrieve your light colors. This will allow you to work back and forth between lights and darks, and will allow you more flexibility in the evolution of your painting. There is a lot more I could tell you about these techniques, but enough for this posting! I will be teaching this method in greater depth the next session of my online studio class. Visit the Classes section of my website for more information!
By the way, my "mystery artist" in my first demonstration above was a young Salvadore Dali!
Susan Murphy, ARThouse, October 29, 2012
This just in! One of the workshoppers, Lindsay Lucas, sent this finished statue painting from the workshop, showing a statue made by a New Mexico artist. The little woman with the big hands is showing what you look like in the mirror!
 And this Mounted Water Sprite was sent by Anupama Sinha:
This just in! One of the workshoppers, Lindsay Lucas, sent this finished statue painting from the workshop, showing a statue made by a New Mexico artist. The little woman with the big hands is showing what you look like in the mirror!

The resulting "masterpieces" from your workshop are so varied and intriguing!! I bet all the participants were thrilled with their pieces! Kudos!
ReplyDelete