Tuesday, February 28, 2012

Watercolor Still Life--how I painted "Mugs and Mums"

As promised, here are the step-by-step photos taken during the painting of Mugs and Mums.  This was a scene I photographed at a cute little cafe that had just opened in Venice, Florida, called the Blu Island Bistro.  The morning sun was streaming into the glass-cased sunroom, where little bouquets of fresh flowers in square vases were positioned on each table.  We had a wonderful breakfast there and I highly recommend the place!

Step 1.  I have been getting lazy about drawing lately, so I created a black & white "template" of the photo by printing it out lightly on plain copy paper.  I then traced this using Saral graphite transfer paper onto a quarter sheet of stretched 140 lb Arches cold-pressed paper.  I feel that if you know you can draw accurately, you do not have to prove it each time you want to paint!  On the other hand, drawing by hand might result in a picture with more character, and I would never discourage it.

Step 2.  Next I put masking fluid (Daler Rownery) on the flowers because the spider mum was going to be difficult to paint around.  Also I did a light background wash using quinacridone gold to represent the sunlit areas of the table.  I splattered some water on the wet wash to variegate it with backruns.  I began to paint in the bottom of the square glass vase.


Step 3.  Now I had fun painting the mugs.  I used cerulean blue to get a little granulation going, plus cobalt blue and quinacridone gold.  I splattered a little paint on the picture with my brush.

Step 4.   Here I started suggesting the streaks of sunlight.  So important to get enough value contrast!

Step 5.  To get the flowers to really stand out, I knew I had to get dark enough in the background.  I wanted the big shadow (from the windowsill) to have a soft edge, because it is being cast from farther away (check the original photo above).  I painted in the napkin roll on the left, and suggested the one on top with purple, but took this out later.  Again, I purposely used backruns to create interest in this shadow area.

Step 6.  Now I started painting in the mums.  For the white mums. I used some purplish, yellowish shadows, while for the green spider mum, I just mixed a bright green and filled in the spaces.  Here are all the colors I used in this painting:  Winsor & Newton cerulean blue, cobalt blue medium, permanent violet, quinacridone gold, Hansa yellow by Da Vinci (an arylide yellow), and peacock blue by Holbein (a thalo blue).

Step 7.  I added the tea or coffee (whichever you  prefer) using quin gold.  Also added the flower centers with a mixture of dark colors.  I went back into the mugs and tried to suggest a more glossy surface by glazing with some hard edges (glossy surfaces have more hard edges reflected, while matte surfaces have soft internal edges).  I also painted the rest of the windowsill shadow on the top side, plus suggested the edge of the table with a strong dark.  While the big wash was wet, I spattered the picture with some cerulean blue.  I love to do that!  This is as far as I have gotten.  I am thinking of adding a tea bag or a spoon in the upper left, sort of hidden behind the blue mug. 
Susan Avis Murphy, AWS     Mugs and Mums     9x13"
  Self-critique:  This came out pretty well by my standards--not too tight and not too loose.  The mug in the background actually looks more like a water glass, and I might make it into one by making it look more transparent.  The jagged negative space in the lower right bothers me, and I might put another streak of shadow coming across it.  Also I think the picture really could use one more prop, like a tea bag or spoon, or maybe a sugar packet.  What is your opinion?  Please tell me on the blog!  Are you having any trouble with your painting?  Let me know on the blog and we can discuss it.

Sue,  ARThouse Studio School,  February 28, 2012

Friday, February 24, 2012

Ten tips for painting loosely in watercolor

In our class at ARThouse this past week, we are learning about loose painting in watercolor.  Many people express a desire to paint more loosely and freely, because of the beautiful effects that can be obtained in watercolor with this approach.  We briefly studied the style of Charles Reid, and discussed different ways to make your painting looser.  Here are 10 Tips for makings your paintings looser in watercolor:
  1. Start with a simple contour drawing that is less precise and has more character than you usually might do.  When you paint, don't feel that you have to stay within the lines!
  2. Use a bigger brush than you normally would.  A good quality kolinski brush that points well will allow you to paint both large and small shapes.
  3. Use lots of water.  Splash it around a little and let it drip!  Don't worry about backruns.
  4. Usually mix your colors on the paper rather than on the palette.  Allow one color to blend right into another even though they are in two different objects.
  5. Don't do too much glazing--you will muddy the picture.  Try to paint each object with no more that two washes--one for the base color (or "local color") of the object, and one for any shadows.
  6. Don't try to make too many corrections.  It will start to look over-worked!
  7. Keep your pigments fresh and bright.  Clean your palette and change your water more often!
  8. Work a little faster than usual, although don't ever paint mindlessly!  Concentrate on what you are going to do and then do it, with a minimum of brush-strokes and with an economy of means.
  9. Leave parts of the painting up to the viewer's imagination; just suggest areas and don't spell them out.
  10. Don't make things too perfect!  The essence of loose painting is a brisk and spontaneous look.  It may not be spontaneous, but it looks that way! 
For my class demonstrations, I did two paintings based on still life scenes I photographed at an adorable little cafe in Venice, Florida, called the Blu Island Bistro.  We had breakfast there twice in January, and the light was streaming into the restaurant's sunroom just beautifully, illuminating the 1950's style "retro" table settings and decor.  Here are the two photos I used as a basis for these paintings:


 In this posting I will show the step-by-step demonstration of my painting process in working from the second photo, called Blu Island Bistro--Fruit and Grits.  In the next posting I will show the painting process for the first photo, called 
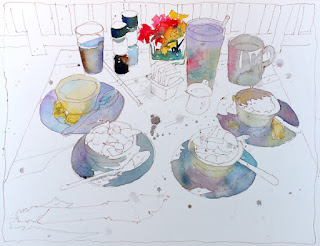
Blu Island Bistro, Mugs and Mums.


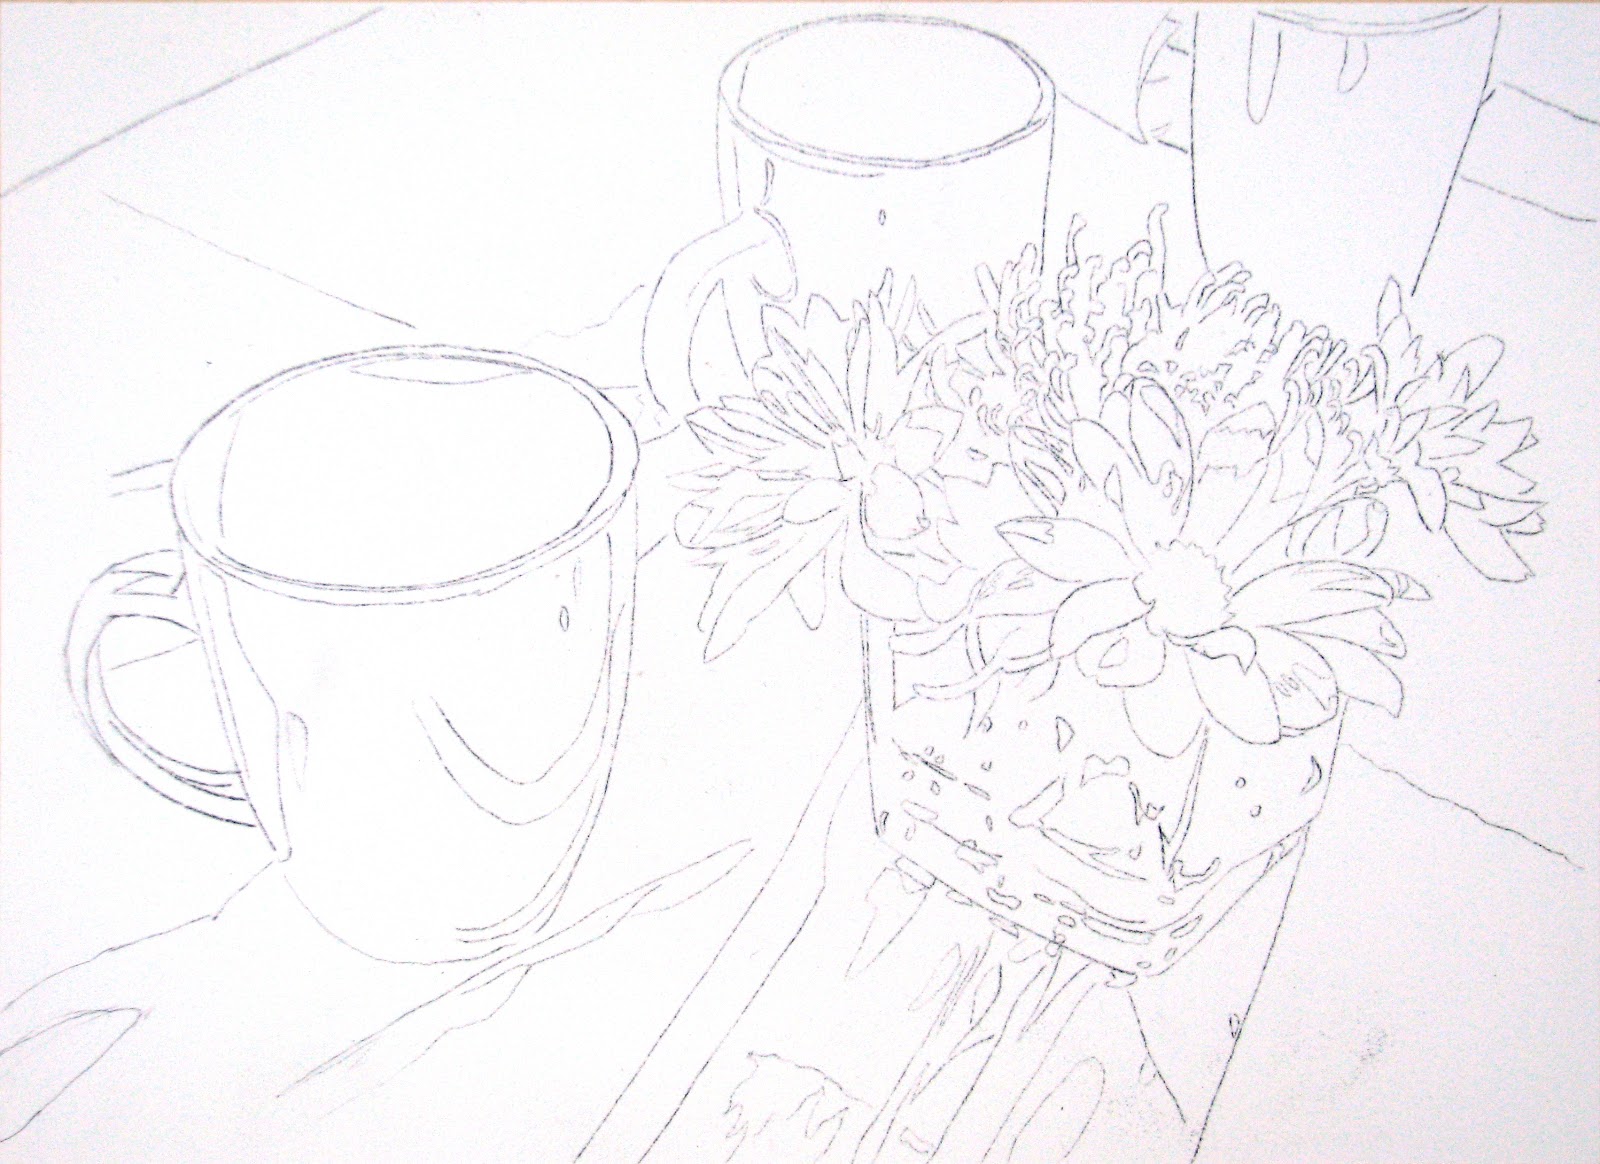
Step 1.  I made a black and white template of the image and transferred it to watercolor paper using Saral graphite transfer paper.  I changed the composition a little by taking away the paper coffee cups, adding a white mug, and moving the sugar container in front of the flowers.  I am working on a piece of 16x20" bright white Arches 140 lb cold-pressed paper that has been stretched and stapled to a homasote board. 

Step 2.  I  don't want the graphite showing through my painting because it isn't very attractive (plain pencil would have been better to my mind).  But I do want fine lines to show through.  So I went over the whole drawing with a Sakura Micron 01 burnt sienna colored pen.  These are both indelible and lightfast.  I tried to give the drawing a little more character and a quirky style.

Step 3.  I started painting the local colors that I observed on the objects, keeping in mind that most of them are in shadow.  I feel that I already went a little too dark at this stage, which caused me to have to go darker than I wanted with the rest of the painting.  During the whole painting process, I occasionally splattered paint and let it drip, plus allowed backruns to form.  You can see all these pictures larger by clicking on one, and they will all appear larger in a new window on the blog.  I will tell you right now all the colors I used in this painting (mostly Winsor & Newton): quinacridone red, Winsor red, hansa yellow (Da Vinci), cerulean blue, ultramarine blue, cobalt blue, Peacock blue (Holbein--a thalo blue), cobalt turquoise light, verditer blue, permanent violet, and quinacridone gold.

Step 4.  Next I started to paint the large background wash (made with peacock blue, permanent violet, and a little yellow) on the mauve-colored  formika table.  I wish I had just pretended the table was white, by the way...  This light wash will represent the local color of all the areas that are in sunlight.  I allowed the paint to drip and run together in funny ways.  The painting board was propped 2" high with a box of waxed paper to allow this broad wash to run down and even itself out.

 Step 5.  Now I mixed a darker version of the same colors and started a large wash representing all the shadow shapes on the table.  It is hard to run such a large wash all at once, so I stopped at the bottom and wet the edge with clear water so that it would dry with a soft edge.  That way I could continue the wash later and have it merge together without a hard edge.

Step 6.  Here I have continued the shadow wash across the entire table.  I regretted that it was a little too dark, but felt that putting very dark areas on the left and right side of the table would help in the end to make it look like a shadow on a light surface.  I also painted the yellow sugar container, and the top rims of the glasses.

Step 7.  Now I began painting the grits and fruit.  In keeping with the desired looseness of the painting, I often allowed colors to blend together on the paper.  I got too much blue in the grits, but fixed it later.  For the doilies, I painted around their edge with a little medium blue, and then washed it away to create a slight shadow around the edge.  I just suggested the doilie holes with little spots of color.

Step 8.  Quite a bit has been done since the last step.  I painted the other fruit bowl and some of the grits, the silver ware, and the shadow on the fence in the background.  I also drew in two chairs and then painted the local color of the floor in the sunlight, which was a golden oak color.  Something a little confusing about this scene is that the table was up against a glass wall.  Outside the glass was a walkway with a white fence and a swimming pool beyond it.  Although you cannot see the pool in the original photo, I eventually decided to suggest it with a teal background beyond the fence (see next step).  Also here I splattered more paint on the paper and tried to create some drips, a la Charles Reid.  It was hard to get the paint to run!

Step 9.  Still working on the background here.  I used cobalt turquoise light for the pool color.

Step 10.  Now to get that dark color around the table, I used quinacridone gold, mixed toward the bottom with permanent violet.  I decided to add more appearance of striped shadows coming from the 8 o'clock morning sunlight.  I am happier with the painting now that some darks have been added around the table.  The style is much "messier" than I would normally paint, but that was the idea.  Hopefully it will work in the end...

Step 11.  Here I added a shadow to the chair on the left, in keeping with the streaked shadow shapes coming across the table.  I also decided to add a band of brown at the bottom to make the table have a better proportion and bring some of that brown all the way around the picture.  Also I painted the lettering on the salt and pepper, and tweaked some of the objects.  This picture has been complicated!

Step 12.  In order to improve the composition a little, and make it less symetrical, I added a coupon card for the Blu Island Bistro.  To do this, I taped around the area with 3M drafting tape, then used a Mr. Clean Magic Eraser to remove the paint.  (Cut off a little square of this sponge-like material, dip it in water, and then rub the surface gently to remove the paint.  Blot with a paper towel).


Step 13.  I was then able to pencil in, and then paint in, the writing on the coupon.  I also expanded the bottom edge of the table.  The painting is almost finished, at least enough for this blog posting.  I will keep it in view for a few days and perhaps make minor improvements.
Susan Avis Murphy   Fruit and Grits at Blu Island Bistro    14x18"

Self critique:  As I said, I wish I had kept the large shadow area a lot lighter and perhaps more of a beige color.  It seems unnaturally blue!  It will be interesting to see how people react to this painting when they come into my studio.  Perhaps I should have put the coupon at a different angle.  I like the shadow stripes on the pool deck, but think the pool is too close for a pool!  However the turquoise color adds a lot to the painting.  I will probably do more paintings from this series of still life photos, but will return more to my usual style.

What do you think about the painting?  Any ways it could have been done better?  I would appreciate any feedback (please post your comments on the blog).   Next posting in a few days will be a blow-by-blow account of the painting of the other photo above.  Below is a sneak peak at the finished painting!   Good luck with your painting--      Sue

Susan Avis Murphy     Mugs and Mums     9x13"

Sunday, February 19, 2012

Painting loosely in watercolor--a brief study of Charles Reid

In our first two classes we focused on painting a single object and depicting the surface characteristics of that object in a tight, realistic manner.  In our third class from my course, Still Life with a Difference, we are going to take a different approach.  We are going to attempt to paint a full still life in a loose and free style.  And to get started, we are going to study the style of Charles Reid a little bit.

What watercolor still life course would be complete without introducing Charles Reid?  Many of you are probably already familiar with the work of this well-known, highly revered, and much imitated artist!  If you have any books by Charles Reid, please bring them to share with the class!

Here is an example of one of Charles Reid's still lifes:
Black Coot with Paint Brushes and Tubes by Charles Reid

Although in the watercolor world, Charles Reid's paintings are probably known best for their loose and apparently spontaneous style, the fact is that many other things are at work to make this painting a success.  In his book, Painting What You Want to See, Reid discusses extensively how he uses the local color of his objects to dominate the painting even more than their value.  He actually uses local color to represent value.  For example, the local color of the lemon above, is a light value by definition.  Yellow is really never a dark value!  Whereas blue can be a dark value, and red tends to be a medium value.  He may even change a certain color in a painting in order to get a darker or lighter value in that area.  The blue background in this picture (above) appears dark to us, even though it is a medium value of blue.  If he had made the background yellow, it would have appeared too light, thus affecting the division of space.

Here is another example of this emphasis on local value rather than local color:
Charles Reid     Half Moons    watercolor     22x25"
 Above is the final painting, where Reid altered the scene to reflect its real impression on him, and what he wanted to see, as opposed to the more realistic sketch below that emphasizes the tremendous value contrasts present in this back-lighted scene:

What differences do you see between these two interpretations?  Reid comments that both are valid, but that his style and personal preferences are for the warmer, more light and airy version on the top.  Local color of objects is established first, and then shadow put on that is not drastically darker than the local value.  The shadow on a white object is not darker than the light part of a dark object.  Think about that for a minute.  The shadow side of the white flower jug above (in the first of the two pictures) is lighter than the part of the blue chair that is in sunlight.  That is how we know that the jug is white!  So when we look at Reid's loose, painterly style, we must keep in mind his preference of color statements over value statements.


Now for the question of that loose, free, colorful style!  I have heard Reid comment that his paintings are really not as spontaneous as they appear, and are painted more slowly than you might expect.  Contour lines are first drawn in freely but accurately, in Reid's quirky, somewhat distorted, style.  Local colors and values are painted in loosely, allowing color to blend on the paper and bleed outside of lines.  A combination of hard and soft edges is used.  The paint is allowed to puddle and dry in odd ways.  Often drips and splashes are incorporated.  Reid often paints watercolor on an easel and allows drips to run down the painting.  He paints broad areas first, and doesn't focus on finicky little details.  He doesn't really "refine" the painting except for making compositional alternations if needed.   Color, shapes, and value are really his main subjects.  If you look carefully at his paintings, they really embody the essence of "loose" painting!

Here are a few more examples, to whet your appetite for loose painting:

 Folk Seagull

Pintail View

 Maple Syrup and Spring Flowers

Wild Roses
cover of book, Painting What You Want to See by Charles Reid

You can see all of the above pictures in a larger version just by clicking on one of them!  So, we are going to try a loose painting style in class this week, using existing photos as a reference or a still life that you might set up at home.  Make it a "casual" still life because that will lend itself much more readily to this loose, spontaneous style!


Monday, February 13, 2012

Still life paintings done by students of ARThouse

I would like to share with you some of the still life paintings done so far by students in my Still Life with a Difference course here at ARThouse.  I think these are fabulous.  They are based on the first week's assignment to paint a still life with a glass object.  We discussed some possible compositional problems with some, but otherwise, wow!!  I didn't manage to capture a photo of all the good paintings that came in, so hopefully we will put up more student results in the future.  Stay tuned!

 Cecile Kirpatrick   Chilled Pinot Grigio and Lemons  14x18"

 Cathy MeDermott    Glass of Water   13x9"

 Mimi Hegler    Mason Jar and Onions     16x20"

 Sue Adams     Cobalt Blue    12x14"

Tony Tiu     Still Life with Glasses     13x18"

Sally Drew     Little Italy     13x9"

Ruth Sentelle     Gardenia in Glass Vase     10x14

Evelyn McKay     Abbey Manor     14x10"

Donna Moeller    Lemons in a Bowl    14x18"

And here are the other two paintings I did as demonstrations:
Susan Avis Murphy     Creamer and Spoon    9x8"

Susan Avis Murphy     Japanese Bowl     9x9" (unfinished)


Friday, February 10, 2012

Watercolor still life demonstration: "Shiny Little Creamer"

We just finished our second class in my course Still Life with a Difference.  Last time we painted a glass object (see posting Jan 27, 2012), and this time we painted a shiny silver object.  We are studying the surface characteristics of objects, i.e. what makes them look the way they do and how can we convey that in paint? 

For a transparent object like glass, which is usually also shiny:
  • Glass will pick up highlights and dark shapes from around the room, which will be reflected off the shiny surface.
  • Clean glass is very transparent and will show the colors behind it at almost the same value as they actually are
  • Thick glass will distort shapes as it acts like a lens; it is hard to understand where all the little shapes you see are coming from, but they add to the impression of thick glass.
  • Observe and draw the shapes you see in the glass and paint them accurately
For a shiny silver or gold object:
  • The object does have a certain base color, such as silver or gold, but otherwise acts like a mirror and reflects the colors and shapes around it
  • What makes something look shiny is that the value contrasts on it are much greater.  The highlights are pure white and some dark reflections may be pure black.  Paint a full range of value contrasts in a shiny object and you will get the illusion of shininess!
Here is a photo of the shiny silver object I painted as a demonstration.  It is a small cream pitcher with a small teaspoon.  The pitcher is on top of a piece of glass, which is on top of a gray mat board, with a coral-colored mat board propped up behind it.  The assignment is to paint a picture of a shiny silver object, either using your own photo, doing it from life, or using this photo that I provided.

Step 1:  The image was transferred onto a quarter sheet of stretched Arches 140 lb cold-pressed paper, using a piece of Saral graphite transfer paper.  The image area is about 9x10".

Step 2:  The pitcher and spoon were coated with Daler-Rowney masking fluid so that a smooth background could be painted behind them.

Step 3:  The entire sheet was wet with water, then a wash consisting of permanent rose mixed with Hansa yellow was applied starting from the top and allowed to gradate down the page forming a smooth background.  The sheet was thoroughly dried.

Step 4:  The sheet was gently wet again using a Robert Simmons Skyflow brush, then a mixture of cobalt blue medium and brown madder was applied as a smooth wash going in the opposite direction.  The board was tilted back and forth to even out the wash.  This is tricky and I did it twice to get it intense enough.  The paint was dried thoroughly.
 
Step 5:   The masking fluid was taken off, and then small spots were re-applied only on the highlights.

Step 6:  Using mostly the same colors, I began to paint in the medium-value areas.  I used bright Winsor red for some of the bright reflections.  Also I used a stencil brush to lift out some softer highlights, especially on the inside of the pitcher.

Step 7:  I put in some darker reflections using a little ultramarine blue to get dark enough.  I painted the shadows with a dark mixture of cobalt blue and brown madder.  I painted the pitcher's reflection with mostly cobalt blue.

Step 8: The painting is almost done.  I took off the masking fluid from the highlights, and as usual found that it left a too-hard edge.  So I softened those edges with a tiny stencil brush.  I also created a narrow brighter rim around the spout by carefully lifting with that tiny stencil brush and sometimes using a little drafting tape for form a narrow line.  I painted more dark reflections in the pitcher and the spoon, including a tiny reflection of the spoon itself in the pitcher.  I lifted up some highlights in the pitcher's reflection using a stencil brush and sometimes an "eraser shield" to get a harder edge.
 "Shiny Little Creamer"   image 9x9"    Susan Avis Murphy, AWS

Colors I used in this painting:  Winsor & Newton permanent rose, cobalt blue medium, ultramarine blue, Winsor red, neutral tint, and Da Vinci hansa yellow.

Self-critique:  I am fairly happy with this effort, but wish I had made the background colors a little more vivid.  I intend to add a hint of orange in the pitcher's reflections in the glass on the left side.  I will tweak the edges to make sure they are all pleasing.  What do you think?  Any suggestions for improvements or ways to do this differently?  How are you doing with your own painting?  Any questions?  Please share your comments on the blog!

The next posting will show some student results from last week's assignment.  We have some great results to share with you!!